We have a few miter saw tips here, about 15 of them that will help you get the best use out of your miter saw.
As a beginner woodworker, the miter saw is probably one of the most important tools that should be in your buy-list if you don’t already have one.
It’s one tool that will help you accomplish a lot in your workshop, from quickly crosscutting lumber, crown moldings to making quick repetitive cuts that are accurate.
Although, the principle of operation of the miter saw is rather simple and easy to implement, these miter saw tips will allow you to get more out of it in terms of efficiency and safety.
Table of Contents
Miter Saw Tips
Read on, as I guide you through 15 different miter saw tips which will enable you to achieve more functionality and efficiency out of your compound miter saw.
Tip number 1: Make repetitive cuts using a stop block
Whether you’re making furniture in your workshop or you’re carrying out a new building construction project on the jobsite, it is pretty inevitable that you’ll have to make repetitive cuts.
If you’re a very experienced woodworker, then you’ll know this tip already. You don’t have to mark out the same measurement over and over again.
You can just set the measurement on the miter saw, clamp a stop block to the miter saw stand at the exact length you have to cut repeatedly, then you can just make as many cuts as you need.
Tip number 2: Use a mobile miter saw stand
It is almost impossible to use a miter saw efficiently without placing it on a stand of some sort.
If you’re in your workshop, you can actually place the miter saw on a workbench and work with it like that. However, on the jobsite, the need to move the miter saw from one position to another will always arise.
With a fixed workbench, that would be difficult, but with a mobile miter saw stand, it’s easy as eating pie.
So, that’s tip number 2. Get a mobile miter saw stand and see how flexible, comfortable and efficient using your miter saw becomes.
Tip number 3: Install a laser
Many new models of miter saws usually come fitted with laser which lights a thin line across the work-piece, at the exact line where the blade will cut through.
The laser line allows you to cut faster because you don’t have to bring the blade down to the line you’ve marked to make sure it’s on the line.
Once the laser line is on your mark, you can start the saw, and bring it down on the work piece, and it will go through your mark.
What if you have an older saw that did not come with a laser? Well, you don’t have to sell your old saw to buy a new one with a laser marker (though you could).
You can actually buy a laser guard from your local hardware store or from Amazon. It can easily be fitted on the blade, by replacing the washer that holds the blade with the laser guide, and Bang!, your miter saw has a laser.
Whenever you want to make a cut, you no longer have to stress yourself trying to align the blade with your mark.
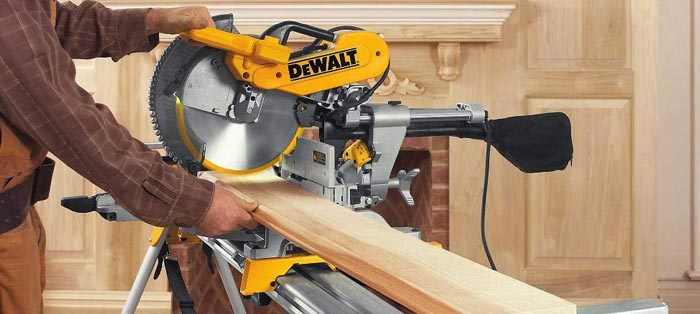
Tip number 4: Cut wider boards with your miter saw
If your miter saw is not a sliding miter saw, the width of the boards you can cut with it is limited. But you can cut wider boards too with your miter saw even though it’s not a sliding one.
Achieving this fit is simple, just place a board under the wide board you want to cut, then make the cut. You’ll see that your cutting capacity will increase either by an inch or half an inch, depending on the thickness of the board you placed under it.
Another way to cut wider boards is to cut one side of the board first, then flip it over and cut the other side.
Tip number 5: Allow the blade to reach maximum speed
Although it’s tip number 5, but it’s actually one of the first things you need to learn about using a miter saw, especially for safety reasons.
When you squeeze the power button of your miter saw, you have to wait for the blade to reach maximum speed before letting it down on the work piece.
Don’t worry it won’t take long (just seconds)
That will ensure that it cuts through the wood without any hiccups. Some miter saws start with a jerk, due to the sudden movement of the blade.
While some are equipped with smooth start features that allow the blade to start from rest without jerking the saw and transitioning into maximum speed.
After the cut is made, you also have to release your hand from the trigger and allow the blade to come to rest without raising it from the work piece yet, and also holding the work piece firmly on the miter saw table.
Lifting the blade off the work piece prematurely before it comes to rest can cause the off-cut to fly off the table, especially if it’s small and may cause injury if it hits someone.
Tip number 6: Upgrade your saw blade
Out of all the miter saw tips revealed here, this one is probably the one that’s going to save you a whole lot of frustration and stress. Any saw, whether it is a miter saw, table saw or circular saw is only as good as its blade. If you want to make better cuts, you have to upgrade the blade to a better quality one.
This is very important especially if you engage in finish carpentry or cabinetry. You need cuts that are smooth and flush, a good blade makes all the difference.
A compound miter saw might have a good motor, bevel and slide effortlessly, but if the blade is not good, it’s still going to suck.
So, invest in a good quality blade, so you can get the best results from using your miter saw.
Tip number 7: Construct a miter saw jig for holding moldings
Cutting crown and cove moldings are just some of the many things you can use your miter saw to do. Yet they’re still a bit tricky to do, especially for a beginner.
However, with a miter saw jig for cutting crown and cove moldings, you’re find it much easier to use your miter saw to cut moldings.
Tip number 8: Add an auxiliary fence for cutting small pieces
Apart from keeping your hands far away from the blade, there’s almost no danger when cutting longer pieces of wood.
The danger lucks around when you have to cut off small pieces of a longer piece. Because the piece you’re cutting off is small, it can easily be sent flying off at a very high speed if it gets caught by the blade after the cut is made.
This, of course poses serious danger to you and any other person standing there with you in the workshop.
However, you can prevent this from happening by doing two simple things, one we have talked about before.
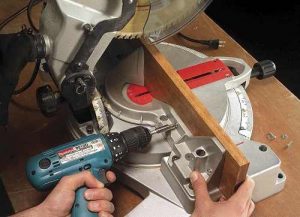
First, equip your miter saw with an auxiliary fence as shown in the image below. The auxiliary fence will prevent the small cutoff from falling back into the blade.
Secondly, allow the blade to come to rest before lifting it off the cut. We have mentioned this before. This is very important because lifting the blade from the cut when it’s still at a very high speed can actually make the blade to catch the small cutoff and send it flying into the air, which is the situation we are trying to avoid. Is it not?
Tip number 9: Use a red marker to mark danger zones
Although a very useful tool, and probably safer to use compared to a table saw and a circular saw, the compound miter saw also very dangerous and needs to be paid proper respects.
One of the best way to pay it this respect is to keep your hands as far away from the blades as possible. To remind you of this, you can simply mark areas where the blade passes through and never put your hands in those areas.
Draw red lines on the fence and bed of the saw to remind you not to put your hands beyond those areas when making a cut.
If you’re using a 10 inch miter saw, then draw the line 7 inch in from both side of the saw base and fence and 8 inch in from both sides of the saw base and fence of a 12 inch miter saw.
Tip number 10: Buy a double tilt saw
If you don’t have a miter saw yet and you’re in the market for one, it is important that you get a double tilt or double bevel saw instead of a single tilt saw.
This is just to make things easier for you when making bevel cuts, especially if you want to use your saw for trim work.
It allows you to cut bevels in both directions of your workpiece or material without going through the trouble of flipping the material all the way around.
On the other hand, if all you want to do with your saw is to make simple crosscuts, then you don’t have to worry about a double bevel saw.
A single bevel saw coupled with a good quality blade will cut it for you.
Tip number 11: Use clamps to hold small pieces
Remember I mentioned earlier in tip number 9 that you should mark danger zones or hands free zones on your miter saw.
The question however is, how do you hold very small pieces on the miter saw when there is no part of the piece outside the danger or hands free zone.
The answer is simple. Use a clamp. By clamping the small piece you’re trying to cut to the fence (use an auxiliary fence) you not only ensure your safety by keeping your hands off the piece and out of the danger zone, but you also ensure the accuracy of the cut, as the piece you’re cutting will not slide off in any way as it is firmly clamped to the auxiliary fence.
Tip number 12: Use a sacrificial board
If you’re not using an auxiliary fence, you can still cut off small pieces by making use of a sacrificial board to backup the piece you’re cutting.
The sacrificial board will prevent the small piece from being caught up with the blade and hence prevent it from being thrown off dangerously into the air at high speeds.
Apart from using the sacrificial board, don’t forget to also allow the blade to stop spinning before lifting it off the cut as this can also make the blade to get caught up with the small piece even though you’re using a sacrificial board or an auxiliary fence.
Tip number 13: Opt for a see through blade guard
The blade guard is one of the most important safety feature of the miter saw, yet the purpose of having it can easily be defeated or cumbersome if you cannot see through it to view the blade.
Without a transparent blade guard, you’ll have to lift the blade guard for you to line up the blade with the piece you’re cutting, which is not only cumbersome but also time wasting.
So, do yourself a favor and get a miter saw that comes with a see through blade guard.
Tip number 14: Easy blade changing
Ones in a while, you’ll have to swap out the blade of your compound miter saw and replace it with a new one, or with one with a different functionality.
When that need arises, it will be important that your miter saw’s blade is easy to change. The process should be quick and easy.
A miter saw with an onboard blade wrench will also make things easier while changing the blades.
Tip number 15: Pay attention to safety
This can never be over emphasized. It’s one of the few miter saw tips you never want to forget. When you get a new miter saw, the first thing you need to do is read the instructions from the manufacture and make sure you follow all the safety procedures outlined.
If you have to change blades, make sure you unplug the saw from the socket first to prevent any accidental starting of the saw.
Like every other saw, miter saw produce saw dust when making cuts, hence it is imperative that you use goggles to protect your eyes from the dust produced.
Always keep your hands away from the danger zones and never try to hold small pieces with your hand while cutting. Instead, use a clamp.
Those are the 15 miter saw tips you need to know if you have or are planning to add a miter saw to your tool arsenal.